
Set up a Local SonarQube Instance for OSS - Chapter 1

SonarQube is an open-source platform developed by SonarSource that provides continuous inspection of code quality through static code analysis.
There are two ways to set up SonarQube analysis - you can select from the cloud solution (sonarcloud ) or install a SonarQube instance on your machine or a remote server. Today we will cover setting up a local SonarQube instance to analyze your code.
The stack
JavaScript, TypeScript, Docker, sonarqube-scanner, dotenv
Your app and SonarQube
The process of continuous inspection of code quality produces a detailed report on code vulnerabilities, bugs, code smells, and code duplications. By using SonarQube, developers can benefit in the following ways:
- Improving Sustainability: By simplifying the system, minimizing potential weaknesses, and reducing code duplication, the lifespan of applications can be extended
- Error Detection: SonarQube automatically identifies coding errors and alerts developers to fix them before they become a problem
- High-Quality Code: SonarQube is a great component in software development to maintain high-quality code
- Consistency Boost: SonarQube monitors for code violations and improves overall quality, ensuring consistency in the codebase
- Skill Development: Feedback on quality issues helps developers enhance their coding abilities and improve their skills
Run the local SonarQube instance
Setting up a local instance of SonarQube is a straightforward process, and here is the documentation . From this page you can see that there are two installation options - using a Docker image or downloading a Zip archive with the execution files. In this article we will show you how to set up the local instance of SonarQube using the Docker image.
To run the SonarQube instance using the Docker image, you need to run the following command: docker run -d -p 8084:9000 sonarqube:latest. This command will run the SonarQube instance on the 8084 port. You can change the port if you want, but don’t forget to change the port in the sonar-project.properties file as well. The property that you need to change is sonar.host.url.
Project setup: basic
Generate a token
After logging into the SonarQube web app at http://localhost:8084 (or substitute your custom port number), you can create a new project for your application and set it up from the SonarQube web UI, but we don’t need to do that. We will create a project right from our application.
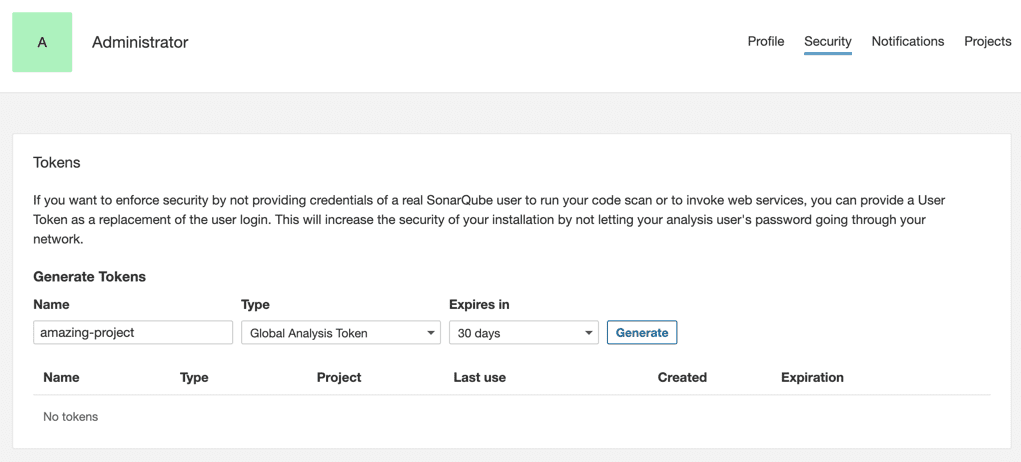
To do this, we need to generate a token for communication with the SonarQube instance. Click on your profile icon at the top right corner of the web app and select My Account from the opened list, then click on the Security tab.
At this point, you should see this form on the screen. Here, you can generate the token. Make sure you copy and save it somewhere - you will need to create a new token if you lose the previous one.
Set up the application
Now we can move forward with our application. To create or update the existing project
from our application, we need to install the sonarqube-scanner dependency (npm install -D sonarqube-scanner)
and create a SonarQube project configuration file. This file should be named sonar-project.properties.
The basic configuration for the SonarQube project will look like this:
# Required metadata, project key should be specified
sonar.projectKey=unique-project-key

# Folders that need to be inspected by SonarQube
sonar.sources=src

# Files we want to exclude from the inspection, for examplewe don't really need to inspect test files
sonar.exclusions=/**/*.test.ts,/**/*.test.tsx
Now you can create/update the SonarQube project from your application.
The sonarqube-scanner makes it very easy to trigger SonarQube / SonarCloud analyses
on a JavaScript code base, without needing to install any specific tool or (Java) runtime.
You need to run it to push your updates.
You can specify the url at which the SonarQube web app is running, otherwise, the sonarqube-scanner
will try to reach it at http://localhost:9000, and the token generated in the previous step.
You can do this in your sonar-project.properties file.
For more flexibility, you can specify the url directly when you are executing the sonarqube-scanner
by passing a desired url as one of the configuration properties called - serverUrl.
To make it more flexible, especially for CI, you can use a local .env file and read from it using tools
like dotenv .
A basic script to analyze your project looks like this:
// Import the sonarqube-scanner and dotenv
const scanner = require('sonarqube-scanner');
const { config } = require('dotenv');

// Read the .env file
config();

// Run the sonarqube-scanner with the configuration
scanner(
  {
    serverUrl : process.env.SONAR_SERVER_URL,
    token :  process.env.SONAR_LOGIN_TOKEN,
  },
  () => process.exit()
);
The full list of options for running the scanner can be found in the sonarqube-scanner’s Arguments section.
To run this script, you can create a script in your package.json:
{
  "scripts": {
    "update-sonar-project": "node scripts/sonar-analysis.js"
  }
}
And then run it with npm run update-sonar-project.
Basic output
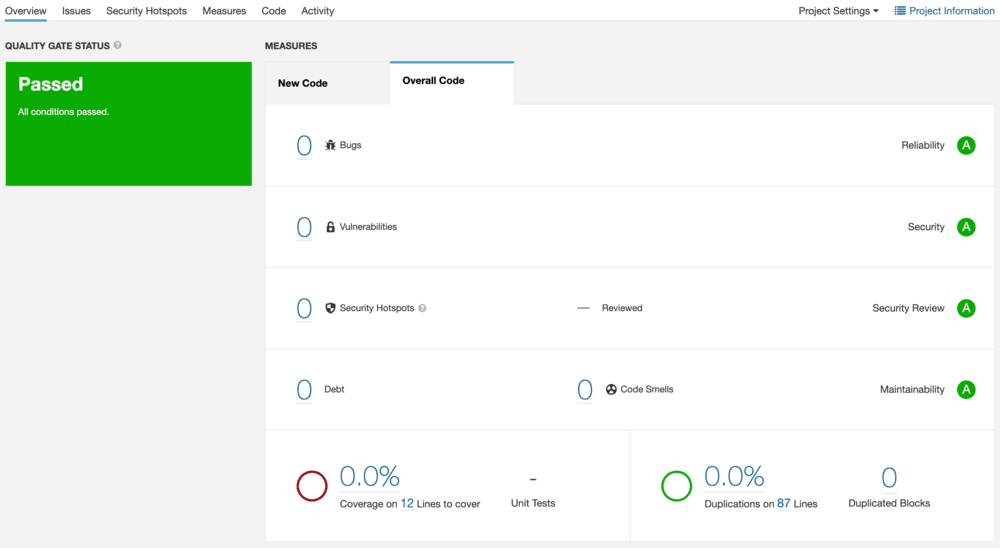
The scan results will create or update the project in the web app, so you should be able to see it under the Projects tab.
Conclusion
With this simple configuration, we can already see and explore a lot of useful information about our codebase. In further blog posts, we will discuss how to configure and use additional features of SonarQube, like tests coverage data and live code inspection in your IDE.
You can now checkout our second blog post in this series.
At Upgade.js we are always looking for interesting projects, feel free to contact us to learn more.